Wednesday, May 22, 2013

Grits Bar: feeding a big crowd with dribs and drabs

For Adam's birthday last year, I bought him a fuzzy logic rice cooker to replace our old school standard rice cooker that we've had for years. It [unintentionally] turned out to be a classic Homer Simpson gift. Adam never wanted a rice cooker and I was the one who wanted a new one, but I'd transferred my yearning for a new rice cooker onto Adam. At least I didn't get the rice cooker engraved with my name. Fortunately, I'm delighted with the new appliance and I've been using it to make all sorts of things. Most notably, easy grits or polenta with almost no work. It's awesome!

Last night, I was on to cook dinner for our church small group. Cook a meal for a dozen people including vegetarians and gluten intolerant folks, only use food I already had and clean out the fridge/freezer while I was at it...challenge accepted! I only had dribs and drabs of a bunch of different things, but I was inspired by previous dinners my friends had cooked. I always loved it when I could top my own [baked potato, taco, chili] with my own toppings [cheese, sour cream, veggies, meat]. Feeling inspired by my friends' genius ideas, I put my rice cooker to good use on the porridge setting and cooked up two batches of grits. I dug deep into the fridge and freezer and found all the little bits of ingredients that were hanging around for a grits topping bar. One friend even said my dinner was "restaurant quality" which was super sweet and nice to hear although I'm pretty sure it was because I liberally salt and pepper all my food. I'm a one trick pony, but it works.

Rice cooker easy grits (From Fifteen Spatulas)
4 cups water
1 cup grits or course cornmeal
1 cup grated cheese (parmesan or cheddar)
Salt + Pepper to season
1/4 cup half and half or milk or cream
2 Tbs butter

1. Put water and grits in rice cooker
2. Cook on porridge setting
3. Stir in other ingredients when it finishes cooking

My dribs and drabs...whatever you have that you're trying to get rid of. Please remember to season with salt and pepper.

  • Bacon bits: 5 leftover slices in the freezer
  • Sausage: 2 andouille and 4 boar sausages from Laurel, also from the freezer
  • Garlic shrimp: small bowl of frozen cooked cocktail shrimp heated with garlic and olive oil
  • Chopped scallions
  • Mushrooms: 2.5 caps from the fridge that yielded only about 1 cup cooked
  • Wilted garlic spinach: half a box of baby spinach cooked down with garlic
  • Green beans: also leftover in the fridge
  • Peppers and onions: leftover in the fridge from Boston Organics

Wednesday, May 15, 2013

Travel wardrobe complete...for now

Traveling during transitional seasons through multiple climates poses some packing challenges. Right now I'm on a 10 day trip up the west coast and I'm rather delighted with myself for my packing job. I recently sewed the buttons back on my navy blazer and acquired a new coat and some sneakers on this trip. I don't want to jinx myself, but dare I say that I think I've cobbled together the right mix of clothes to take me from 80 degree sunny LA to rainy 50 degree formal dinner in Seattle to 60 degree city exploring in Vancouver. I think I could even take on colder weather if I had to since I can layer a cardigan, blazer, down sweater and a raincoat if needed.

1 grey sneakers
1 blue patent Birkenstocks
1 pair brown boots

1 skinny jean
2 dresses
3 shirts
1 down sweater
1 raincoat
1 navy blazer
1 cardigan
1 scarf
1 black leggings/tights
1 necklace (nice to have)
1 belt (nice to have)
1 swimsuit (nice to have)

1 purse crossbody
1 foldable tote
1 umbrella

Personal items like underwear, socks, pajamas and sock monkeys are additional. 

Wednesday, May 08, 2013

Planes, Trains and probably an Automobile

I'm heading out today for a trip with plasticmom and Adam that will take us from LA to Seattle to Vancouver. The highlight of our trip is a 36 hour train trip from LA to Seattle aboard the Amtrak Coast Starlight complete with sleeper cars. I've never traveled overnight on a train so I'm pretty excited for this  train ride since I hear the views are gorgeous. I've got my camera packed and I freed up 8 gigabytes off my iPhone just to take photos. All aboard!!!

Monday, May 06, 2013

Design Find: Eames Hang It All affordable alternative

If you've been to our home during the winter, you may have noticed a big pile of coats suspended off a wall in our front entry. You may or may not have wondered what was under that giant pile of coats. It's our adorable Eames Hang It All wall hook that hibernates all winter under a big pile of coats and comes out to play in the warmer summer months when it's been unburdened from its winter coat responsibilities.

I'm a big fan of our Eames Hang It All. We've had ours for eight years and it's moved with us to three different homes. At the end of a long winters day, this little guy gets the job done when it comes to holding a whole lot of coats. The round spherical wooden knobs are gentler on our clothes than pokey wooden style wall hooks and did I mention that the Eames Hang It All is super cheerful and colorful?

While I love the Eames Hang It All, it's not exactly cheap at $199 bucks. That's why I was super excited to find a great alternative from Land of Nod. Land of Nod is the Crate & Barrel brand for kid's furniture and they offer some really great affordable mid century inspired options including the Multiplayer Wall Hook priced at just $14.95. Similar to the Eames version, The Land of Nod wall hook looks sturdy, features the same spherical knobs and is colorful to boot. While the Land of Nod wall hook as fewer knobs than the Eames, at $14.95 you can buy two wall hangers and still be WAY ahead.


Totally covered in coats and miscellaneous winter gear


Footloose and fancy free in summer


Eames Hang It All from Herman Miller: $199


Multiplayer Wall Hook from Land of Nod: $14.95

Friday, May 03, 2013

The Ultimate Sprinkledoodle Cookie Taste Off

May the tastiest Sprinkledoodle win! 


I just love these sprinkle cookies, they're delicious and happy looking. The sprinkles are not just decoration. Encrusting the cookie with sprinkles actually adds texture and flavor. Adam's a fan of the Sprinkledoodle in general, but will sometimes wonder out loud, "if you make them a little bigger it might be chewier," or "the sprinkle to cookie ratio might be higher if the cookie was smaller." To find the optimal Sprinkledoodle cookie size, I decided to make them in four different sizes for "The Ultimate Sprinkledoodle Cookie Taste Off." It was also a good excuse to use my collection of cookie scoops.


The Large cookie is equal to 9 small cookies. As for the slightly confusing "Medium Large" and "Medium Small" nomenclature, you can thank Adam. Somehow, it makes sense to him so I'm accommodating his quirks. 


Cookie Dough (not baked)
Left to right: Large, Medium Large, Medium Small and Small


Baked Cookies
Left to right: Large, Medium Large, Medium Small and Small

The challenge: 
Taste all four sizes of Sprinkledoodles and determine the winningest size. You have to eat all four cookies (95ml cookie dough or 19 units of Small cookies) so it's quite the caloric commitment. Zlexa (Taster 5) is on the Paleo diet so I'm honored that she broke her diet to partake in this taste off. On the other hand, maybe the cavemen would still be around if they'd just enjoyed some Sprinkledoodles in their diet. :)

Taster 1: Adam likes the Medium Large for texture, but likes the Medium Small for size. Ultimately, he cast his vote for Medium Small.

Taster 2: Zrennen, our occasional houseguest who's a pastry chef, likes the Medium Large

Taster 3: Zristina generally likes soft cookies so she went with Medium Large because the Large cookie was just too large.


Zristina

Taster 4: Zana liked the size of Medium Small for portion control, but liked the taste and texture of Large. Zana refused to pick a favorite and wants a Medium Small sized cookie baked at a higher 375 temperature for a little less time to create his ideal cookie.


Zana

Taster 5: Zlexa awards Medium Large with "Best in Show" but likes the Medium Small for the "Coffee Dunkability" award.

Tally:
The winner is Medium Large - 3 votes (Zrennen, Zristina and Zlexa)
Medium Small - 1 vote (Adam)
Abstention - 1 vote (Zana refused to pick a cookie size)

Only Zana preferred the Large for texture. Most others found the Large too big, to "hard to eat," etc. I personally thought the Small size was super adorable, but I'd have to agree with the others that the Small size was all crisp with no chewy center. Zrennen called the Small "a waste of dough."

While the Medium Large did win for texture, everyone agreed that the Medium Small was the bestest size for a cookie so the next challenge is to bake a Medium Small sized cookie with the soft texture of the Medium Large or even Large sized cookie.

If there's a natural relationship between cookie size and cookie softness so the biggest cookies are the softest, one might say there's a natural "Cookie Softness Frontier." See chart below. Basically, the goal is the break past the "Cookie Softness Frontier" and achieve a small soft cookie (orange cookie on the chart). Challenge accepted...for the next Sprinkledoodle Cookie Taste Off, I'll be baking the Medium Small cookie size at three different temperatures (350, 375 and 400) to break through the frontier. Wish me luck on my next Sprinkledoodle adventure in the name of baking science.


Sprinkledoodle Recipe - modified from Lottie + Doof's Sugar Saucer recipe
Ingredients:
  • 4 cups flour
  • 1 teaspoon baking soda
  • 3/4 teaspoon kosher salt
  • 1.5 cups unsalted butter at room temperature (3 sticks)
  • 1/2 cup canola or vegetable oil
  • 1 cup sugar
  • 1 cup powdered sugar
  • 2 large eggs
  • 3 teaspoons vanilla extract
  • 2 teaspoons almond extract
  • rainbow sprinkles...a big vat of them


Instructions:
  • Mix flour, baking soda and salt in a mixing bowl. Ideally a silicone bowl since you'll need to add the dry flour mixture to the batter. Click here for post about why silicone mixing bowls rock.
  • Cream butter on medium with an electric mixer for about a minute
  • Mixer on low, add the oil into the butter and mix well
  • One by one, add sugar, powdered sugar, eggs, vanilla extract and almond extract. Mix well with each additional ingredient
  • Slowly add the flour mixture in four parts. (This is when you'll thank me if you us a silicone mixing bowl)
  • Chill dough for at least one hour or up to 3 days
  • Preheat oven to 350 degrees and line baking sheets with parchment paper
  • Scoop cookie dough (see above table for volume and desired size) and roll in rainbow sprinkles
  • Place on baking sheet and press dough ball down slightly to flatten a tiny bit
  • Bake until cookies are light brown. Obviously Medium Large cookies take longer than Medium Small. 
  • Cool on cookie sheet for a few minutes before moving to a plate or rack. If you touch the cookies right out of the oven, the sprinkles will disintegrate so wait a few minutes for the sprinkles to cool and regain their structural integrity


Bonus fun Chiral* view. Medium Small is the third one down.

*Zorinna taught me all about Chirality in college

Wednesday, May 01, 2013

Recipe: Watermelon Rind Chutney


I usually throw out the watermelon rind like any other normal person, but I decided to save it last week and see what I could make out of it. I decided to try this watermelon rind chutney recipe from Epicurious with a some slight modifications using what I had in the house. The chutney turned out great and we've been enjoying it all week. It's got a little bit of warm heat to it, but it's not too hot. A little cream cheese with the chutney will temper the heat a tiny bit to take the edge off.

Ingredients:
  • Diced watermelon rind from 1 small watermelon. Should yield about 6 cups of diced white watermolon rind.
  • 1.5 cups cider vinegar
  • 1.5 cups water
  • 2 cups sugar
  • 1/4 cups grated fresh ginger (I keep a frozen nob in the freezer and use a microplane)
  • 1 tablespoon Siracha
  • 1 tablespoon crushed red pepper flake (the kind you put on pizza)
  • 1/2 tablespoon chili powder
  • 1.5 tablespoons minced garlic
  • 1 teaspoon salt
  • 1/2 teaspoon black peppercorns, crushed
Feel free to mess around with the proportions on the peppers / hot chili paste /fresh pepper ratio. I didn't want to go out on a rainy day to buy fresh peppers so I just raided my fridge.The ratio I used was pleasantly hot so be cautious when adding any more heat. 

Instructions:
  1. Dice up white watermelon flesh only. Remove any green peel or pink watermelon fruit
  2. Boil rind an all the other ingredients in a heavy pot over moderate heat. Stir until sugar is dissolved
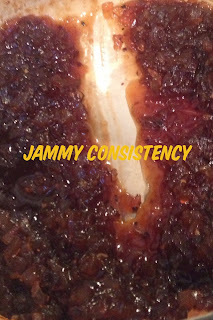
  3. Reduce heat and simmer uncovered for 60-80 minutes until rind is tenter and translucent and you can create a little valley when you scrape the the bottom of the pot. It should be kinda jammy rather than liquidy. Keep simmering and reducing until it's jammy enough
  4. Cool, store in a jar and let flavors mellow and meld for a day
  5. Enjoy! Delicious with cream cheese on crackers.